Most of the best video editing software (opens in new tab) is designed for desktop and laptop computers, but there’s an increasing demand for editing apps on cell phones and tablets.
While many mobile apps, such as Apple’s iMovie, are very basic, KineMaster (opens in new tab) is a more advanced option. It has a multi-layer interface and numerous features, such as blending modes, chroma keying, and audio mixing. First released for Android devices in 2013 and for iOS in 2017, it’s currently on version 4.15.
KineMaster’s standard edition is free, but will watermark your finished videos. To remove the watermark and access advanced features, you must pay a premium subscription fee of $4.99/month or $39.99/year. In this review, we will assess a number of KineMaster’s key features to help you decide whether it’s worth the cost.
KineMaster: Multi-layer editing interface
Some mobile editing apps have very basic interfaces, with significantly less functionality than you’d find on desktop editing software. KineMaster’s interface is more comprehensive.
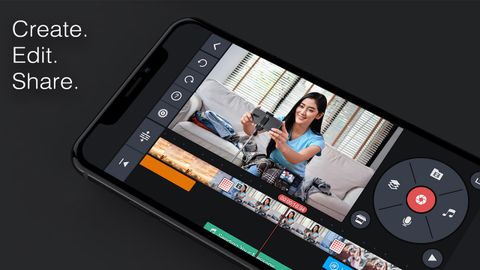
The bottom half of the screen comprises the timeline, with the primary video layer on top, additional video layers below it, and audio layers at the bottom. At the top left of the screen is a preview monitor. And at the top right is a wheel with various options to add media, including from your albums, your device’s camera, and KineMaster’s stock collection. Selecting a clip in your timeline replaces this wheel with the various effects and adjustments you can add.
It’s an attractive and intuitive interface, and it doesn’t take long to work out what everything does and where to find all the features. It’s easy to swap clips around, drag them between layers, and trim them.
There are some limitations, mainly relating to the importance of the primary video layer. This layer can’t have any gaps in it, unlike the additional layers, and its length determines the length of the video.

KineMaster: Colour and lighting adjustments
When you want to adjust the look of a clip, there are sliders to adjust brightness, contrast, saturation, and so on. There is also a wide choice of Instagram-style filters you can apply. This makes it easy for less experienced editors to quickly give their videos an attractive look, though the lack of fine-tuning options means it’s not the best choice if you’re looking for professional color grading.

KineMaster: Blending and chroma key
If you want to change how a clip on an additional layer interacts with the layers below it, then you can use blending modes. The selection of modes is familiar to anyone who’s used Photoshop – overlay, multiply, soft light, hard light, and so on –and they all work well, though again there’s little option for fine-tuning.
There’s also a chroma key feature. This can remove greenscreens, such as to put a presenter in front of a graphic background, and there are a number of options to refine the effect.

KineMaster: Title graphics
To add text graphics to your videos, you have two options – add a text layer or use “clip graphics”, which are more complicated pre-made effects.
With the text layers, you can move the writing where you want on the timeline and adjust various aspects. The clip graphics are less flexible, as they must link to a particular clip on the primary video layer, and they can seem quite gimmicky, such as a title within a cartoon explosion.

KineMaster: Transitions
It’s easy to find and apply transitions between one clip and the next. However, you are limited to the choice on offer, and as with the title graphics, many seem gimmicky and kitsch, such as a heart-shaped wipe.
Transitions are also limited to clips on the primary video layer. Clips on the additional layers can be animated in and out, but can’t have transitions that cross them with adjacent clips.

KineMaster: Audio effects
As with video, you can have several layers of audio clips, and there’s an impressive range of ways to adjust them. You can change the overall audio levels of each clip and adjust the volume as it plays to mix it with other clips.
There are multiple EQ filters, for example to reduce or boost bass, and reverb effects to make the clip sound like a number of possible environments. And, there’s a selection of fun, though gimmicky, voice changer effects to make your voice sound like a chipmunk, a robot, and so on.

Should I buy it?
KineMaster has an impressive range of features, while remaining intuitive and usable. It doesn’t have the depth of fine-tuning options that you’d find in the likes of Premiere Pro or DaVinci Resolve, but it’s a step above most common mobile editing apps such as iMovie.
We tested all the above features on an iPhone 12 and encountered no lag at all, including when working with 4K clips, but some users have encountered slower performance on older models.
KineMaster won’t replace your main desktop software, but it is a good option when quick editing away from the desk is needed. It’s also a good choice for less experienced editors who need an accessible app.
System requirements
iOS:
- iOS v11.4 or later
- Compatible with iPhone, iPad and iPod touch
Android:
- Android OS v6.0 or later
Related content:


